Abstract
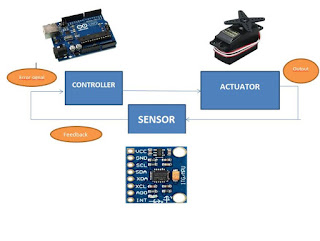
A balancing system with arduino is designed and constructed to hinder toppling of truck bed and that will hinder to accident. The system is controlled by gyro sensor feedback which is placed at the center of the truck bed. A feedback control system coded in arduino drives servo motors acording to gyro sensor feedback to balance the truck bed
IDEA OF PROJECT
To keep to truck bed balanced. The motors must counteract the vehicle falling. This action requires feedback element in the
MPU6050 (gyroscope + accelerometer ). Which gives both acceleration and rotation in all three axes. The arduino uses this to know the current orientation of the truck bed. The correcting element is the
motor and
wheel
combination.
Main Components
MPU5060
(Gyro
sensor), Arduino, Servo Motors
CONCLUSION
We were successfully able to control the truck bed. From this Project we
learnt the working and programming of a arduino in real time. We
also
learnt to communicate arduino, servo motor and
gyroscope.
#include <Wire.h>
#include <I2Cdev.h> //I2C kütüphanesini ekledik
#include <MPU6050.h> //Mpu6050 kütüphanesi ekledik
#include<Servo.h> // Servo motor kütüphanesi
MPU6050 emsal; // sensörümüze Emsal arkadasımızın :) ismini
verdik adını verdik
int16_t ax, ay, az; //ivme tanımlama
int16_t gx, gy, gz; //gyro tanımlama
int16_t ax1, ay1, az1; //ivme tanımlama
int16_t gx1, gy1, gz1; //gyro tanımlama
Servo motor1; // motor1 isminde bir servo nesnesi oluşturduk.
Servo motor2; // motor2 isminde bir servo nesnesi oluşturduk.
Servo motor3; // motor3 isminde bir servo nesnesi oluşturduk.
Servo motor4; // motor4 isminde bir servo nesnesi oluşturduk.
void setup() {
motor1.attach(3); // servo motorun bağlandığı arduino pini
motor2.attach(5); // servo motorun bağlandığı arduino pini
motor3.attach(9); // servo motorun bağlandığı arduino pini
motor4.attach(11); // servo motorun bağlandığı arduino pini
Wire.begin();
Serial.begin(9600);
// serial olarak baslattık ayrıca
Serial.println("I2C cihazlar baslatiliyor...");
emsal.initialize();
Serial.println("Test cihazi baglantilari...");
Serial.println(emsal.testConnection() ? "MPU6050
baglanti basarili" : "MPU6050 baglanti basarisiz");
}
void loop() {
emsal.getMotion6(&ax, &ay, &az, &gx,
&gy, &gz); // ivme ve gyro değerlerini okuma
emsal.getMotion6(&ax1, &ay1, &az1, &gx1,
&gy1, &gz1); // ivme ve gyro değerlerini okuma
//açısal ivmeleri ve gyro değerlerini serial ekrana
yazdıralım
ay=map(ay,-17000,17000,180,0); // İvme sensöründen okunan
değer 0-180 arasına indirgeniyor
ay1=map(ay1,-17000,17000,0,180); // İvme sensöründen okunan
değer 0-180 arasına indirgeniyor
Serial.print(ay); Serial.println("\t");
motor1.write(ay); // Y ekseninden okunan değer servo motora
açı değeri olarak yazıldı.
motor2.write(ay); // Y ekseninden okunan değer servo motora
açı değeri olarak yazıldı.
motor3.write(ay1); // Y ekseninden okunan değer servo motora
açı değeri olarak yazıldı.
motor4.write(ay1); // Y ekseninden okunan değer servo motora
açı değeri olarak yazıldı.
delay(20); //değerlerin değişimini daha net görmek için
biraz beklesin
}
REFERENCES


Hiç yorum yok:
Yorum Gönder